After completing your PHP project (personal practice project or college project), how cool would it be if it would be published on the internet and anyone from anywhere can access it.
But unfortunately, publishing a website on the internet costs and you may not be sure to pay the price.
Here, I’ll show you a Step-by-Step process to publish your PHP project for FREE.
You can check the test website I’ve published from the link below.
http://foodorderwebsite.zya.me/
What is Domain?
Simply, Domain refers to the name of the website (for example www.abc.com). Actually Domain names are unique IP addresses (for example 192.168.1.1).
But it’s difficult to remember such IP addresses of websites we want to visit. So to make it easy to remember we get names in english letters that correspond to each IP address.
Thus there can only be one Domain Name all around the world. (For example, there won’t be a second google.com or facebook.com).
And the system that manages referring Domain Names to IP addresses is called Domain Name System (DNS).
Note: This is Domain Name in a simple layman's term.
What is Hosting?
And Hosting is the place where we store files of our websites like images, pdfs, coding files, database, etc. In general terms it is a computer which is connected to our domain names to store and access data to/from our website via the internet. And these computers need to be online forever (24/7/365) i.e. powered on and connected to the internet to access our website.
So it can be costly to create our own Hosting Computers (called Servers) to host a website. Thus, there are organizations/businesses who create powerful and big hosting computers and lend space to others. And they are called Hosting Providers (Like Hostinger, Go Daddy, Hostgater, etc.).
And the pricing is based on storage we use, processing power (CPU and RAM), Bandwidth, etc.
Note: This is Hosting in simple layman’s terms.
Click Here to watch a video where I discussed more about Domain and Hosting in Simple Terms.
Free Hosting Service Providers
By now, we know a bit about Domain Names and Hosting. And we also know that they cost us some money as well.
But there are some providers who give hosting for Free as well.
Why So?
First, the capacity of the Free Hosting Packages is limited.
Second, it is a promotional offer. If you want to upgrade or need to use more space or power, then you’ll have to pay a premium amount.
Or they’ll run ads on your website.
Now, let’s discuss some of the free hosting providers.
Freehostia:
Freehostia was the first free hosting platform I tried back in 2014.
I used to host my personal domain (vijaythapa.com.np) which is now hosted on Google (Blogger).
The free plan is called Chocolate plan and I’m really glad that they still have this plan.
The hosting is good for small projects as it has 250MB storage and 1 MySQL database with only 10MB storage.
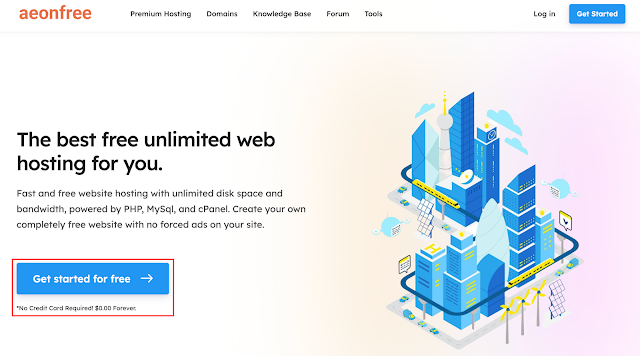
AeonFree Hosting:
This is another free hosting that I tried to host for one of my projects (http://foodorderwebsite.zya.me/ ).
Their hosting offers unlimited disk space, unlimited bandwidth and 400 MySQL Databases but has ads on the website.
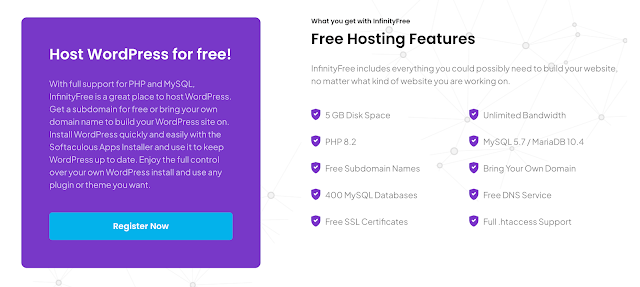
InfinityFree hosting
Infinity Free Hosting is another Free Hosting Service offering 5GB Disk Space, Unlimited Bandwidth and 400 MySQL Databases.
But I found it a bit difficult to set up hosting and start running PHP projects.
You can try from the link below.
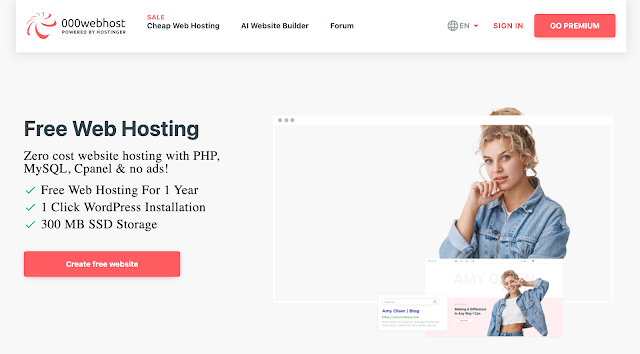
000Webhost:
000webhost is another free hosting plan powered by Hostinger.
The package offers 300MB SSD Storage with 1 Database for one year only.
I’m using premium hosting from Hostinger and I found it one of the best hosting services ever.
But have not used the free package as it did not allow free domains.
Step by Step Guide to Host PHP Website for FREE
Now let’s host a PHP project on one of the free hosting services.
For this article I’m choosing aeonfree as it offers one of the best features on free packages for FREE among others.
Let's start
1. Create an Account with Aeonfree (Free Hosting Provider)
First of all you will have to go to the website of Aeonfree hosting provider and then create a free account by clicking on the “Get started for free” button.
Or click on this link https://web.aeonfree.com/signup
Once you fill the form, an activation link will be sent to your email.
 |
| Creating a Free Hosting Account at Aeonfree |
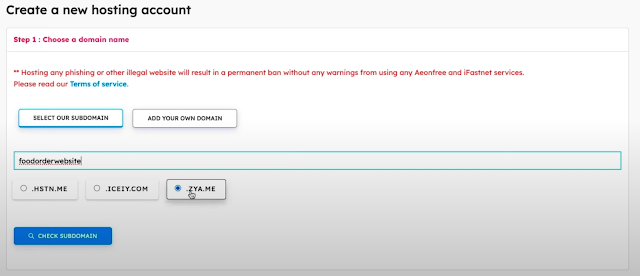
2. Select a Free Sub Domain
Next step is to select a Free Sub Domain so that you can share the link of your project and anyone can find it online.
In your account, you need to create a new hosting account.
You can also add your own custom domain if you’ve already bought it.
 |
| Selecting a Free Sub Domain at Aeonfree Hosting |
3. Create and Import Database in Hosting
Now, we need to set up a database for the project in hosting.
If you’ve created your project locally using XAMPP or MAMP, then you’ll have to export the database file and import it to the newly created database on hosting.
(Click Here to watch the tutorial to learn import/export database).
In your hosting account, click on the Control Panel button, then go to the database section to create a new database.
 |
| Creating a Free MySQL Database at Aeonfree Hosting |
4. Upload All Project Files to Hosting
Then we need to move our website project file to the hosting file manager (public_html or htdocs).
You can zip your project and import it to the hosting and then extract it there.
Or you can move the files and folders manually.
 |
| Uploading Project Files on Aeonfree Hosting |
5. Make Changes on Project Setting Files
Finally, we need to make changes to the project config file so that the project can be found online.
Just go to your config folder of your project and open constants.php file.
Then update constants with new values.
SITEURL (‘your new domain or subdomain name’). Example:
DB_USERNAME (‘new database User’)
DB_PASSWORD (‘new database User Password’)
DB_NAME (‘new database name’)
Note: Your hosting account username and password are the Database Username and Database Password, respectively.
%20file%20.png) |
| Making Changes to the Project Configuration Files on Hosting |
Follow the Tutorial
Recommended Domain and Hosting
Based on my personal experiences these are the best service providers I'm using to buy Premium Domain and Hosting.
Namesilo has the cheapest and fixed domain pricing among others.
Most of the domain providers have pricing in such a way that it seems cheaper at first because their registration price is cheaper but the renewal prices are far more expensive.
If you compare the prices,
Namesilo Offers domain (registration and renew) at $13.95.
Hostagator Offers Domain Renews at $19.99 (registration at $12.99)
Godaddy Offers Domain Renews at $22.17 (registration at $0.19 - only for 1 year but you need to pay 3 year fee to get this price for first year)
So if you're looking to get domain for long term then it'll cheaper with Namesilo.
But if you're just getting the domain for 1 year then choose the cheapest ones among all the domain providers.
After trying couple of hosting providers, I've settled with Hostinger to host my personal as well as clients website.
They've fast, secure and fully feature packed hosting packages at an affordable prices.
Anyway, thank you so much for staying to the end.
And choose domain and hosting providers based on your need.
Also hope the Step by Step guide to host a PHP website for FREE was helpful.
You may also like:


![Advertisement [ad]](https://blogger.googleusercontent.com/img/a/AVvXsEgVAiCox6-vLXsNZas8ks-nfos0PgdnL4yClmlqOkl92t7zGdYYiLBy9AHMZFxBYe06DVmN6JGQ9S0P3iClXk8l43FIQPDyAcx_uMmV0bN9JlKjTzOAi7YjmQo6cuvHgkEO76L-hcqV-TWE29v93eeFby8MOAOuJ8DcilHTPpfP8aKg8TG9uYCDaMxcr8H1=s600)

Comments