With more than 810 million websites (43.1%) in the internet powered by Wordpress as it's easy to setup and get going, the number of people or organization having issues on changing the password is also high.
It might be due to the website being hacked and email changed or just forgotten the password and can't remember the recovery email, or your IT team or web design agency stopped responding your call, you want to change the password and get control to your website.
Then this is the only way to change your Wordpress Login password if you have forgotten both Password and Email Address. It is easy but bit technical, so not much people try this option.
But if you follow all these steps correctly, you will learn it safely and successfully.
In order to change your Wordpress Password without email address, please follow these steps
1. Access Your Hosting Cpanel
Any hosting you’re using to make your website available on the internet, you need to login now.
If you’re using normal or locally provided hosting services, then you can access your hosting cpanel by adding “/cpanel” to the end of your domain.
For Example: yourdomain.com/cpanel
But if you’re using new and advanced hosting services like Hostinger, then you need to login to their account.
2. Open Database PHPMyAdmin
Once you login to your hosting cpanel or hosting admin panel, you need to go to Database Section and Open phpmyadmin to make changes in your database.
On cpanel based hosting
After you login, just scroll and you will see the Database section with phpMyAdmin.
Just click on phpMyAdmin and a new tab will open with your database.
 |
| phpMyAdmin on Cpanel based hosting |
On Hostinger Hosting
a. Go to Website Management Section
After login, click on Websites menu on top navigation bar. Then when your website is shown, click on Manage button as shown in the image below
 |
| Going to Website Management Section on Hostinger |
b. Go to Database Management Section
 |
| Going to Database Management Section on Hostinger |
c. Go to phpMyAdmin in Hostinger
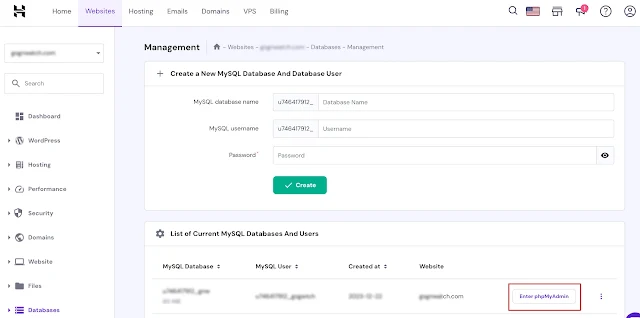
Now you will see the list of your databases, Click on Enter phpMyAdmin button of your database as shown in the image below
 |
| Going to phpMyAdmin section on Hostinger |
3. Change Password in User Table
If you've followed all thee steps above successfully, then you're on phpMyAdmin.
Now, from here, we will open our database and go to wp_users table.
a. Find your correct database inside phpMyAdmin.
There are default databases like "performance_schema" and "information_schema". You shouldn't make any changes on these.
Other databases except theses two are the databases created by you or your team for your website. So select your database and click on it as shown in the image below
 |
| Select the Correct Database on phpMyAdmin |
b. Now, Find "wp_users" table and open it
Once you click on your database on the left navigation bar, explore the tables on the right side of the screen.
And click on wp_users table as shown in the image below
 |
| Open wp_users table |
c. Find User to Change Password
Once you open "wp_users" table, you will see the list of all users on your website.
Now, select the user you want to change password and click on Edit button with Pencil icon as shown in the image below
 |
| Select User to Change Password in phpMyAdmin |
d. Change the Password
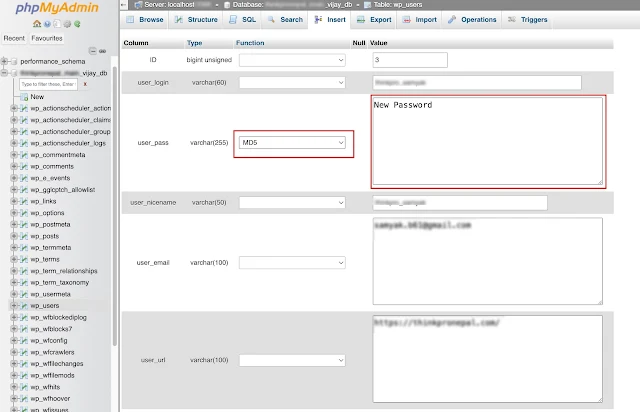
Now, go to the user_pass, Change the password with Your New Password on value section and select MD5 on function column as shown in the image below.
Then click on Go button at the bottom.
 |
| Password Change of the User from phpMyAdmin |
That's it.
Now try logging back in to your Wordpress admin with the updated Password.
If you have any issues, then please let me know in the comment below.
Also if the article was helpful then spread the words among your family and friends who might find it helpful.
Thanks and Regards!


![Advertisement [ad]](https://blogger.googleusercontent.com/img/a/AVvXsEgVAiCox6-vLXsNZas8ks-nfos0PgdnL4yClmlqOkl92t7zGdYYiLBy9AHMZFxBYe06DVmN6JGQ9S0P3iClXk8l43FIQPDyAcx_uMmV0bN9JlKjTzOAi7YjmQo6cuvHgkEO76L-hcqV-TWE29v93eeFby8MOAOuJ8DcilHTPpfP8aKg8TG9uYCDaMxcr8H1=s600)

Comments